User:Dugo/My sandbox
Contents
fuzzball notes
** Important Note ***

This fuzzware is distributed only with permission from the Defense Advanced
Research Projects Agency (DARPA) under the condition that it not be
redistributed outside of the receiving organization without prior DARPA
approval. It is provided on an as-is basis only. Users should be cautioned
that only very minimal help is available and that support and maintenance is
not a contractual responsibility of the distributor.
I know nothing about RT-11, let alone fuzzball operation, this is going to be fun!
NET : 129.140.0.0 : NSFNET-BB : San Diego CA -- General Atomics -- San Diego Supercomputer Center, SDSC Urbana-Champaign IL -- University of Illinois -- National Center for Supercomputing Applications, NCSA Pittsburgh PA -- Carnegie Mellon University -- Pittsburgh Supercomputer Center, PSC Ithaca NY -- Cornell University -- Cornell Theory Center, CTC Princeton NJ -- Princeton University -- John von Neumann National Supercomputer Center, JvNC Boulder CO -- National Center for Atmospheric Research, NCAR
There are 30ish FUZZ entries in a 1987 DoD Internet Host Table, not sure if the NSFNET-BB fuzzballs were listed though.
Mills archive http://malarky.udel.edu/~dmills/data/du0/
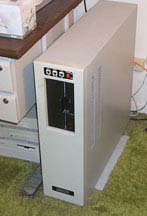
What to set cpu in simh? what it looked like.. eg this LSI-11 http://www.eecis.udel.edu/~mills/pic/fuzzballb.jpg
1MB mem in a 85/86 era pdp-11
DEQNA UNIBUS, PROTEON Unibus ethernet cards??
from tcp-ip archive:
- BRL used 2 PDP-11/34's and 1 11/23
- the 256Kb of memory on the full up 18 bit version of the PDP-11's is entirely adequate for an IP gateway.
What disks .. 2 RL02s look cool http://hampage.hu/pdp-11/kepek/1123PLUS.JPG
11/23 had what .. 248k?
From: http://lists.ntp.org/pipermail/hackers/2003-September/000321.html
The stuff I have is the Fuzzware for the NSFnet backbone, including all
sources, binaries and scripts. It's on three RT-11 flopette images now
spining on mort. Fuzzballs used the LSI-11/73 with the PDP11/45 memory
segmentation hardware, a real-time clock board and any of several kinds
of disk drives. Getting that stuff to spin in a simulator would be an
interesting exercise.
get/compile/strip simh pdp11
check pcap path .. maybe add -lnl .. mkdir BIN $ gmake USE_NETWORK=1 all
install rt-11 5.3
wget http://simh.trailing-edge.com/kits/rtv53swre.tar.Z
uncompress rtv53swre.tar.Z
cat rtv53swre.tar |tar -xvf -
cp Disks/rtv53_rl.dsk rl1.dsk
wget http://www.dbit.com/pub/pdp11/empty/rl02.dsk.gz
gunzip rl02.dsk.gz
cp rl02.dsk rl0.dsk
touch lpt.txt
cat >inst.ini <<__EOF
set cpu 11/23+ 256K
attach LPT lpt.txt
set rl1 writeenabled
set rl1 rl02
attach rl1 rl1.dsk
set rl0 writeenabled
set rl0 rl02
attach rl0 rl0.dsk
set rl0 badblock
boot rl1
quit
__EOF

###restart
###cp Disks/rtv53_rl.dsk rl1.dsk; cp rl02.dsk rl0.dsk


$ pdp11 inst.ini

PDP-11 simulator V3.8-1
Disabling CR
Overwrite last track? [N] y
ZA[c\
        Welcome to RT-11 V5.3

        You have bootstrapped the RT-11 Distribution Disk.  Use this disk to
        install your RT-11 system, then store it in a safe place.

        RT-11  V5.3  provides an automatic installation procedure which will
        back up your distribution disk and build a working system disk which
        should  be  used for your work with RT-11.
        This  working  system disk will only  contain  the  RT-11  operating
        system.  After  the  RT-11  installation  is  complete,  follow  the
        installation instructions  packaged  with  any optional languages or
        utility software which you will be using.


        Press the "RETURN" key when ready to continue.

        You  can  choose  to  install  RT-11  manually.  This  procedure  is
        described in the RT-11 Installation Guide.

        If  you  are a new user of RT-11, DIGITAL highly recommends that you
        use the automatic installation procedure.

        Do you want to use the automatic installation procedure?
        (Type YES or NO and press the "RETURN" key): y

        You  will  be guided through the installation process by a series of
        instructions  and questions; you have an interactive dialog with the
        RT-11  installation  program.   All  you  need  to  do is follow the
        instructions  carefully.  When  the  instructions ask you to mount a
        disk in a specified drive, find the disk with the correct label  and
        mount it in the drive, as shown in your installation booklet.

        Do  not  remove  any  disk until specifically instructed to do so.
        Once  a  disk  is  mounted in a drive, it must remain in the drive
        until a message appears asking you to remove the disk.

        Press the "RETURN" key when ready to continue.


        Please enter today's date in the following format:

        DD-MMM-YY
          where DD is the day of the month
                MMM is the first 3 letters in the name of the month
        YY is the last two numbers of the year

        For example:   September 19, 1984 is 19-SEP-84

        Type in the date, then press the "RETURN" key.

              16-oct-94


        A backup copy of the distribution disk will now be built.
        Mount a blank disk in DL0 (Drive 0).
        See the Automatic Installation Booklet for mounting instructions.
        (Remember that the disk is not mounted until you have pressed the LOAD
        button and the READY indicator light is on).


        Press the "RETURN" key when you have mounted the disk.


        Before  a  blank  disk  can  be used it must be prepared so that the
        software can write data to it. This preparation is called initiali-
        zation.

        The disk in DL0 is now being initialized.

        The following procedure should produce informational  messages
        in the form ?FORMAT-I-Message,  or ?DUP-I-Message.  No  action
        is required as a result of these messages.  If BAD blocks  are
        detected, the block number will be provided.  This information
        should be noted for future reference.

        This can take approximately fifteen minutes.  Please wait...


?DUP-I-No bad blocks detected DL0:

        Now copying the distribution disk from DL1 (Drive 1) to DL0 (Drive 0).

        This may take up to five minutes.  Please wait...


        Your backup copy of the distribution disk is in DL0 (Drive 0).

        Please remove this disk from DL0 and label it
        "RT-11 V5.3 BIN RL02 BACKUP".
        Refer to Appendix B of your installation booklet for instructions
        for dismounting a disk.

        Press the "RETURN" key when you have removed the disk.


        Your working system disk will now be built automatically. This  disk
        will contain the RT-11 Operating System.
        Select a blank disk and label it: "RT-11 V5.3 BIN RL02 WORKING"
        and mount it in DL0 (Drive 0).


        Press the "RETURN" key when you have mounted the disk.


        The disk you mounted in DL0 (Drive 0) is an original distribution
        or backup disk.

        The next procedure initializes DL0.  As a  result,  any  files
        that currently reside on DL0 will be permanently lost. If  you
        would like to retain any files,  EXIT  from Automatic Installation
        Procedure and copy  them  to another volume.


        Do you want to EXIT from Automatic Installation (Y)? n
        The disk in DL0 is now being initialized.

        The following procedure should produce informational  messages
        in the form ?FORMAT-I-Message,  or ?DUP-I-Message.  No  action
        is required as a result of these messages.  If BAD blocks  are
        detected, the block number will be provided.  This information
        should be noted for future reference.

        This can take approximately fifteen minutes.  Please wait...


?DUP-I-No bad blocks detected DL0:

        Now copying RT-11 from DL1 (Drive 1) to DL0 (Drive 0).

        This can take approximately two minutes.  Please wait...

        Your working system disk will now be bootstrapped.

        Press the "RETURN" key when ready to continue.


RT-11FB  V05.03

.TYPE V5USER.TXT

                              RT-11 V5.3

       Installation of RT-11 Version 5.3 is complete and you are now
    executing from the working volume    (provided you have used the
    automatic installation procedure). DIGITAL recommends you verify
    the correct  operation  of  your  system's  software  using  the
    verification procedure.  To do this, enter the command:

                             IND VERIFY

        Note that VERIFY should be performed  only after the distri-
    bution media have been backed up.  This was accomplished as part
    of automatic installation on  all  RL02,  RX02,  TK50, and  RX50
    based systems,   including the  MicroPDP-11 and the Professional
    300.  If you have not completed automatic installation, you must
    perform a manual backup before using VERIFY.  Note also,  VERIFY
    is NOT supported on RX01 diskettes,    DECtape I or II,   or the
    Professional 325.

    DIGITAL also  recommends  you  read  the  file V5NOTE.TXT, which
    contains information  formalized too late to be included  in the
    Release Notes.  V5NOTE.TXT can be TYPED or PRINTED.


.
get the fuzzware
This used to go by mail http://hpwren.ucsd.edu/~hwb/NSFNET/NSFNET_lost+found/RIMG0022.JPG http://hpwren.ucsd.edu/~hwb/NSFNET/NSFNET_lost+found/RIMG0023.JPG
now we:
wget http://www.dbit.com/pub/pdp11/fuzzball/bos.dsk.gz
wget http://www.dbit.com/pub/pdp11/fuzzball/fuzz1.dsk.gz
wget http://www.dbit.com/pub/pdp11/fuzzball/fuzz2.dsk.gz
wget http://www.dbit.com/pub/pdp11/fuzzball/fuzz3.dsk.gz
gunzip *dsk.gz
and we have DSDD images..
Gee, thanks wizz!
AFAICT DEC didn't make 8" DS floppy drives, simh doesn't have one for the emulated PDP-11 and RT-11 V5.3 doesn't like the idea very much either.
Maybe they are not 8" ;)
deadly quote
"Laugh it up, fuzzball." - Han Solo to Chewbacca, "The Empire Strikes Back"